Restoring hacked WordPress websites have been one of the abilities I’ve had to learn because it happened to some of the website where I worked like this one during this month and be sure it is happening to someone else right now. Most of the malware injected in WordPress I’ve seen are intended to modify the website, steal data and request money via email. Hackers usually claim for money to prevent sharing sensitive data over internet. In other case, they add visible elements over the layout with external links to try to redirect the traffic to another website.
The purpose of hackers is not just to show they are smart for “jumping over secure walls”. They can steal sensitive information or add your website into a slave network of hacked websites acting, like an infected CDN. Check this video to learn more from a senior developer from Kaspersky.
During those downtime moments you need bring security to your clients suspending the navigation with a temporarily message and then returning the website service with a “healthy look”.
If you have an analysis report from your hosting provider, you have a start point to deleting the malicious code. Hosting providers like Bluehost, periodically scan user accounts looking for malicious code, blocking the website and notifying owners with an email to fix it. However, this is not the rule and sometimes you need to start the cleaning labor comparing folders and files with your backup.
To avoid future situations like this I’ve been creating some practices over the years that may help you.
Wordfence: security and removal service
Plugins like Wordfence or Malcare helps adding a firewall and other features. I tried some more but I finally decided to use Wordfence free because it lets you customize many options like blocking rules, email alerts, login 2FA and more.
Let’s explore the Wordfence configurations I use for every website:
Firewall – Firewall (tab)
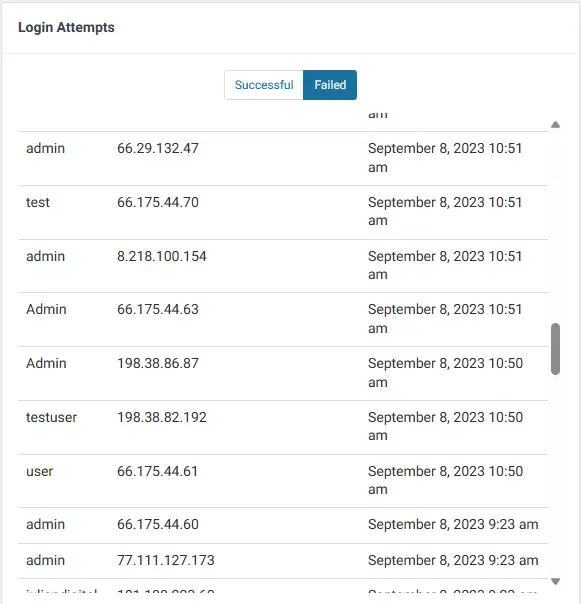
This section is an overview of attacker countries, failed login attempts and more. I recommend at least focusing on Login Failed Attempts section to check what usernames the attackers are using. You can use this information to delete or change the ones you have created. For example, deleting the username admin will reduce the possibility of being hacked.
Scan
This section helps you fix the vulnerabilities of your website related to plugins outdated, public sensitive files, WordPress core file changes, malicious code in files of your WordPress installation or even on files you have manually added and have been infected. Try to keep this section with zero notifications.
Tools
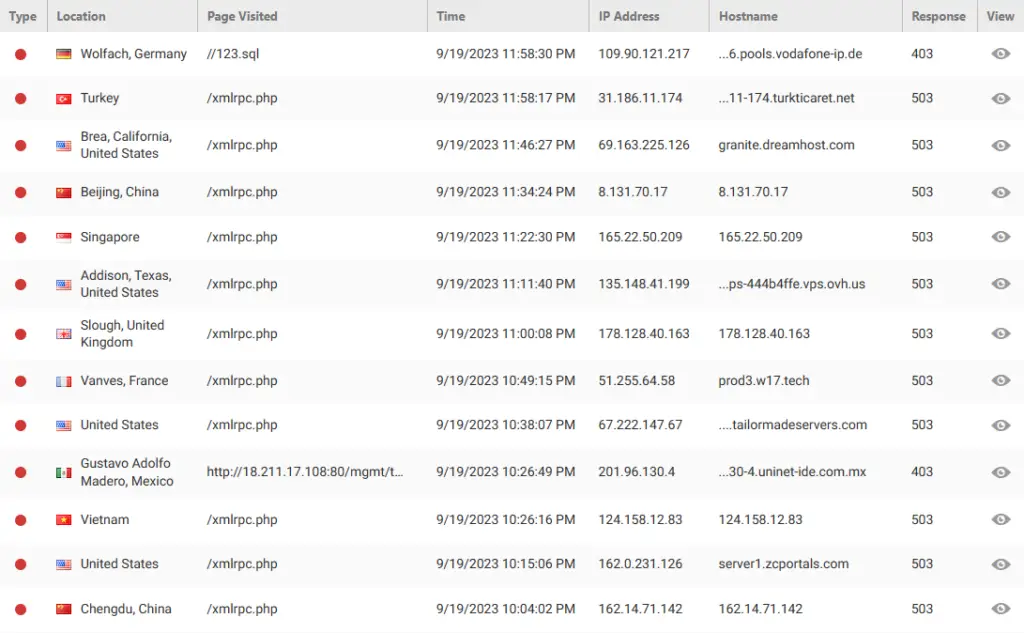
I think this is the key utility in Wordfence. In this section you can see what URLs have been tried to access or attack, the attacker’s IP, country and time. I use this information to update the blocking rules I am going to describe later in Firewall – Blocking (tab).
Login Security
In this particular section, you have the option to implement Two-Factor Authentication (2FA) for each user associated with your WordPress website. This feature serves as a highly recommended additional layer of security that you should seriously consider incorporating into your site’s defenses.
Two-Factor Authentication, often abbreviated as 2FA, is a login security mechanism that goes beyond the traditional username and password login. It requires users to provide not just something they know (their password) but also something they have (a temporary, typically time-sensitive code). Here’s how it works:
- First Factor (Something They Know): The user enters their username and password as usual.
- Second Factor (Something They Have): After successfully providing their credentials, users are prompted to enter a secondary authentication code. This code is usually generated by a mobile app. It constantly changes and is valid for a short period, adding an extra layer of security.
All Options
I prefer to review this section with high attention to detail. I’m going to describe each type of configuration.
Email Alert Preferences
Alerting an administrator has signed in is relevant for me, but getting informed about Wordfence updated could be too much if you have many Wordfence accounts sending emails to you every day, so I prefer to stay up to date about possible attacker trying to log in or getting inform about an increase in detected attacks.
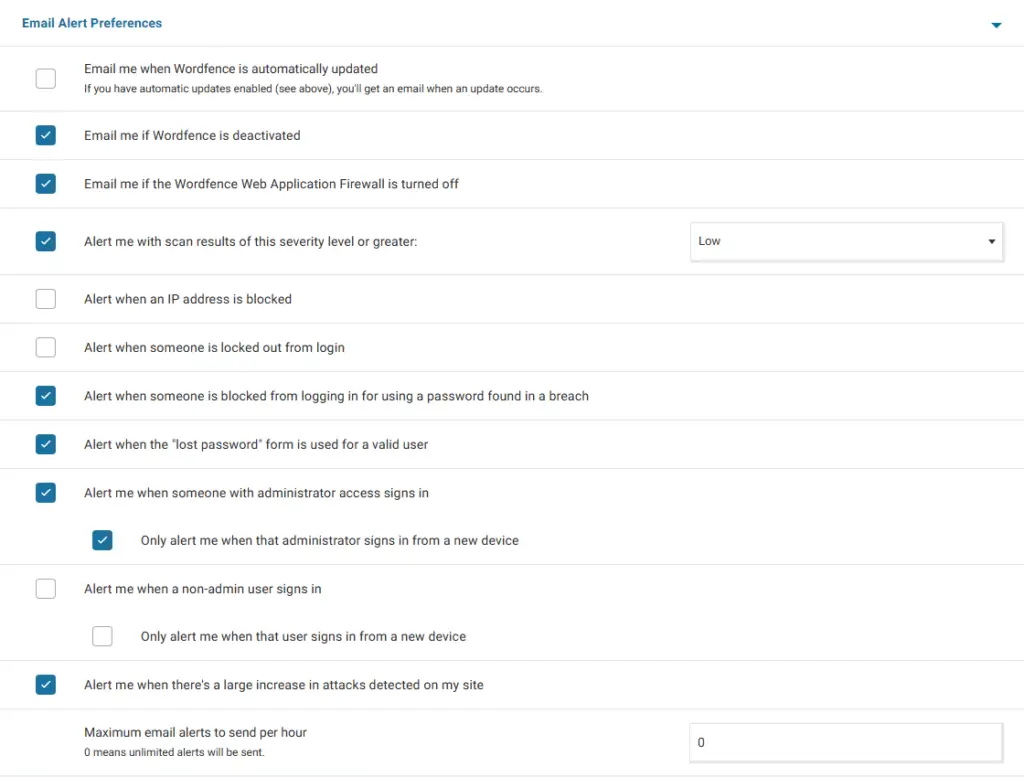
One month ago, I receive an email with a description of vulnerabilities being exploit. I noticed there was a Directory Traversal attack, additionally one Apache vulnerability was exploit. Thanks to this email I took action over the website.
Clarification about previous configurations: I prefer to avoid receiving emails about IP address blocking because I define some strict rules that otherwise will be alerting me the entire day.
Advanced Firewall Options
There are some vulnerable endpoints in WordPress that attackers know and try to exploit every time. I suggest you to manually add them in the field Immediately block IPs that access these URLs:
/xmlrpc.phpThe previous path has been added to the blacklist because is the most commonly requested URL. It worked in the past as an endpoint to save posts sent from emails but today is used to decode credentials.
Remember to check regularly Tools section for checking what are those frequent URLs to add it.
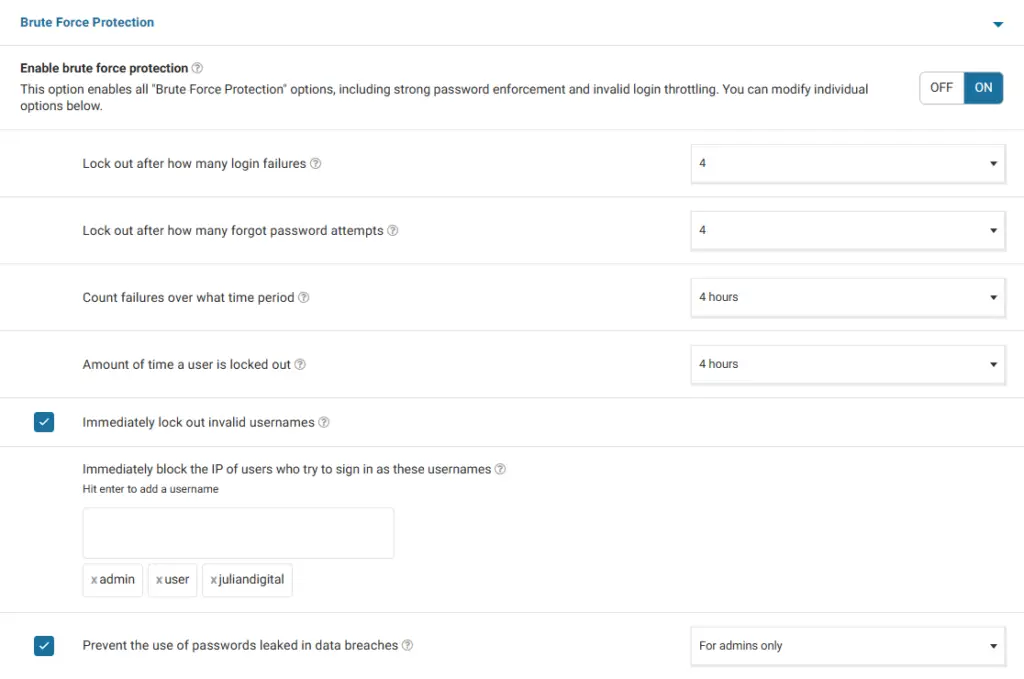
Brute Force Protection
Lock those bots who tries to log in with invalid usernames or fail to log in 4 or more times. Note yourdomainname, user, test and admin are the most popular usernames and attackers like to use them. Block IPs who try to sign in with each one.
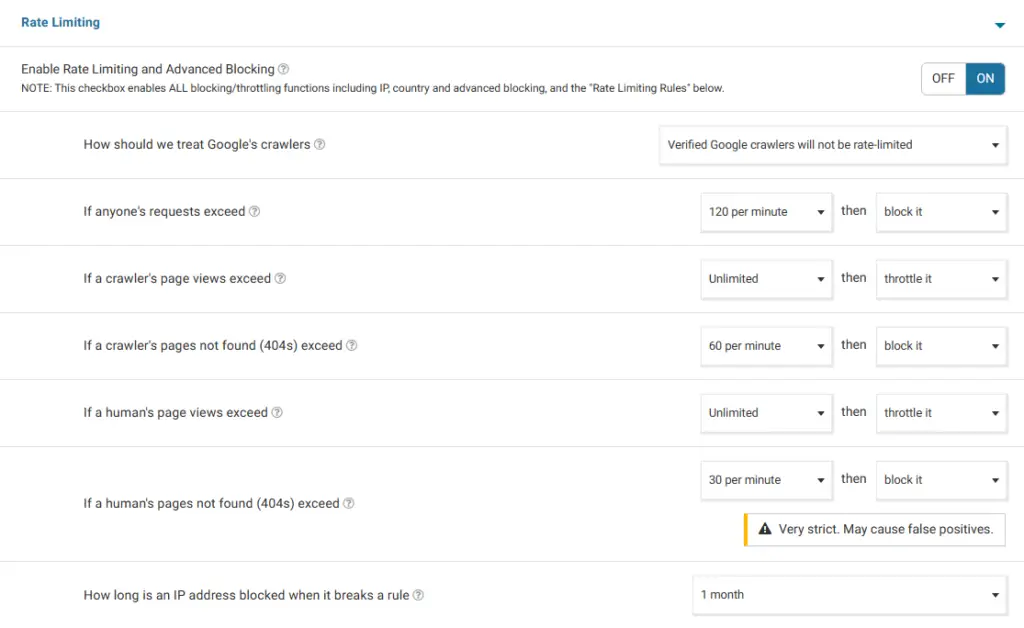
Rate limiting
The following configurations applies to possible bots detected as humans who tries to make request over a large bunch of pages or endpoints. It may cause false positives blocking people to your website if this configuration is over strict, so be cautious setting the number values.
Firewall – Blocking (tab)
This is one of the most important features Wordfence can offer in my opinion. In this section you can check the last IPs blocked by the configurations we saw previously. You can decide to make permanent those blocked IPs and add IPs manually to block. Furthermore, you can also unblock a false positive blocking if it occurs. Try to use this blocking tool, it could help you after an intense attack.
After receiving an email alert about an attack over this website, I went here and block permanently the IPs compromised in the attack. Additionally, I periodically check IPs to try to request not found URLs in Tools and then I make permanent blocking here. As I note this is one strong feature.
Backups
This could be crucial to your business after receiving an attack because guarantees to recover the site to a fresh and healthy copy.
AWS offers an automatic daily snapshot for this purpose and is convenient for blogs. Jetpack offers VaultPress Backup that saves every change in the WordPress installation and is convenient for e-commerce. Additionally, every hosting provider could offer add-ons to do the work for you.
Keep in mind this service usually has a cost. If you prefer to do it by yourself I recommend to schedule this task by frequency: monthly, weekly or everyday. It depends of the type of business as I mentioned before.
If you never update your website don’t waste time and money creating backups but have at least one.
Cloudflare
Cloudflare works as a layer between users and server filtering the requests to avoid potential attacks. It is capable to show a captcha if seems to don’t be a human who is visiting your website.
Let’s configure Cloudflare with a free plan. Then, change your name servers, this means your domain name will resolve other direction different to your installation server, you will direct your traffic to Cloudflare in the moment visitors request your domain name URL. Set the default presets and continue with the next configurations after initial installation:
SSL/TLS
Overview
encryption mode : Full (strict)
SSL/TLS Recommender : On
Edge Certificates
Always Use HTTPS: On
HTTP Strict Transport Security (HSTS): On
Opportunistic Encryption: On
TLS 1.3 : On
Automatic HTTPS Rewrites: On
Origin Server
Origin Certificates : Create your own TLS certificate
Note: If your webpage stop working due to multiple redirects go back to Edge Certificates and review your settings.
Security
In this section you can create and customize your malicious requests filters.
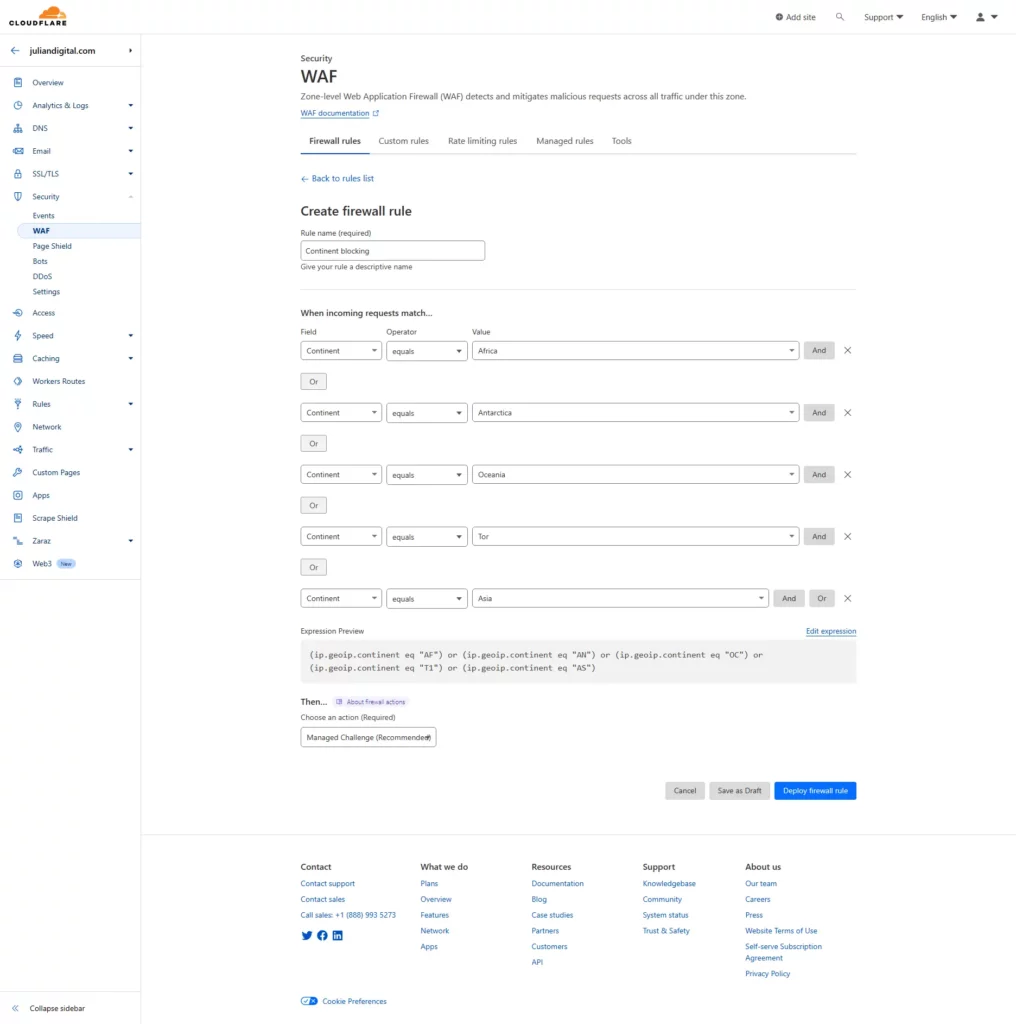
WAF
Add your own rules. I started with Continent filtering because most attacks come from other continents like Asia, Europe and North America. It doesn’t mean I pretend to block users from those locations, but I added a Cloudflare managed challenge that means users from any of those continents will see an additional loading page from Cloudflare while it determines if user-agent and headers from the request are secure. If not, user is blocked.
Settings
The settings are good by default, so I don’t want to say more about that. I think the most important part here is Security Level. It may help you to add a managed challenge (same explained before) for all users if you guess or know you are being actively attacked. I used this one some time ago when I noticed this website was receiving a DDoS attack. Just be sure to change the setting back after going to a normal state.
Final thoughts
In an era where online security threats spreads and data breaches are more common than ever, safeguarding your WordPress website is not just a priority; it’s imperative. As a software engineer who has experienced firsthand the challenges of restoring hacked WordPress sites, I’ve shared with you a series of security measures that have proven effectiveness in fortifying the web.